
Rocket.Chat is an open-source, customizable communication platform. It is built for communities and organizations that put data privacy first. You can build your own Rocket.Chat communication platform on your own server.
It is also made for organizations that need more control over their communications. The platform enables collaboration between colleagues, partners, customers and communities. It does this without compromises on data ownership, customization or integrations.
What Is the Rocket.Chat Communication Platform?
Rocket.Chat is a MERN-based application. It enables real-time communication between friends, other companies or your customers. It works regardless of how they communicate with you. The result is a growth in productivity and customer satisfaction rates.
With Rocket.Chat, you can browse communication, reply to messages and collaborate with the team. Meanwhile, it integrates with multiple communication channels like website live-chat, email, Facebook page, Twitter, WhatsApp and Instagram. It shows discussions from various channels, so you get a single view of the customer. As a result, you spend less time switching between tools.
Using the self-managed offering, you can deploy Rocket.Chat on your own server. Or you can use the SaaS version. Rocket.Chat supports both community and commercial plans.
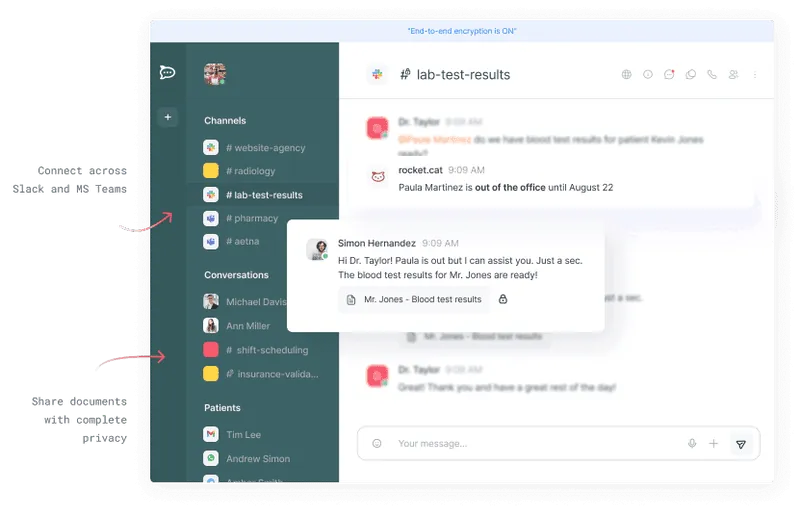
Over 10 million people use it for team communication, customer service, secure file sharing across the team, and much more. In many ways, Rocket.Chat is a leading open-source communication platform.
The Main Features of the Rocket.Chat Communication Platform
Because it is scalable and versatile, organizations can adapt Rocket.Chat in many ways, from internal communication to virtual events. Its openness also allows companies to create new products on top of its code. You can also see our custom software services.
Talk to People Outside of Rocket.Chat
Conversations with other teams should not be a hassle just because they use different communication platforms. Rocket.Chat lets you communicate with partners, vendors or organizations, regardless of their collaboration platform. You can speak to people across Slack, MS Teams, Skype for Business and other communication platforms.
Five Reasons Organizations Choose the Rocket.Chat Communication Platform
Your data is essential, whether it is secret or work-related. Many people think no criminal cares enough about what they do online to steal it. Still, ransomware is a largely automated process that does not need anyone to care about you. All it needs is data that matters to you to be exposed, stolen and then ransomed back to you. To combat this, you need real privacy in your online conversations.
That is one reason to pick Rocket.Chat, but not the only one. Here are five good reasons to pick this Rocket.Chat communication platform over a non-open platform:
Open-source
It has been open source from day one. It has over 1000 supporters worldwide and holds high standards for security, data privacy and transparency. Only open-source platforms can offer this.
It is full of out-of-the-box features. You can make it even more helpful and efficient with integrations and add-on apps. This is just one benefit of being open source. Also, integrations based on webhooks connect the platform you already use with your workspace. This gives you a simpler workflow and growing productivity.
In its Marketplace, you find apps that integrate with other services, such as WhatsApp, Twitter, Jira and Facebook Messenger. Each one is only one click away from your workplace.
Streamlined Communication for Teams and Customers
You do not need a survey to know that employees want to streamline communication in a single application. Rocket.Chat accommodates workplace communication. It also lets you divide communication into channels, threads and discussions to work with your remote colleagues.
It also has extensive team collaboration features that support productivity, such as unlimited access to chat history, broadcast channels and integrations.
Rocket.Chat lets you chat with colleagues, and it also lets you get in touch with customers. Besides, you can centralize your messages in one inbox. Thanks to its extensive set of integrations, you can provide customer support fully from Rocket.Chat, whichever medium your customers use to reach you.
It integrates with standard social media channels, including Facebook Messenger, email, WhatsApp, Telegram and SMS. It also integrates with CRMs, chatbots and machine learning apps.
SaaS or Self-Managed Hosting
Rocket.Chat can be deployed in numerous ways, depending on business requirements. You can pick between deploying it on Rocket.Chat’s cloud, cloud servers under your control, or your premises.
Rocket.Chat suggests one-click deployments for more than thirty deployment processes across many on-premise and cloud solutions. Businesses worried about data security can choose on-premise hosting. It gives you complete control of your data, so nothing leaves your infrastructure. You can host it fully behind your firewall or even on an air-gapped network.
Complete Data Privacy, Security
Rocket.Chat is ISO27001-certified. Its SaaS version runs in protected and audited data hubs. This ensures the best performance and meets strict data localization needs. For the on-premise version, you can use the self-managed installation in your own data hub. It offers layered protection options (e.g., SSL, VPN and DMZ).
Many companies with high data protection standards choose the self-managed option. Examples are the American cybersecurity firm OnShore and the Government of British Columbia.
High Availability Infrastructure and Microservices Architecture
A common pain point for fast-growing enterprises and startups is finding software that grows with them. Rocket.Chat’s microservices architecture lets enterprises scale quickly and save on infrastructure expenses.
In a microservices architecture, the application is a suite of remote services. When you need to scale, you change only parts of the system instead of the whole system. This saves enterprises time and money.
If you are pitching Rocket.Chat to your boss, note that you can start using chat for free. You can also opt for one of its paid SaaS and self-hosted offers starting at $2 per user per month.
Paid plans offer high availability infrastructure, microservices and managerial services. These include LDAP and Active Directory, social media log in, an Atlassian bundle and many more. They also offer push notifications.
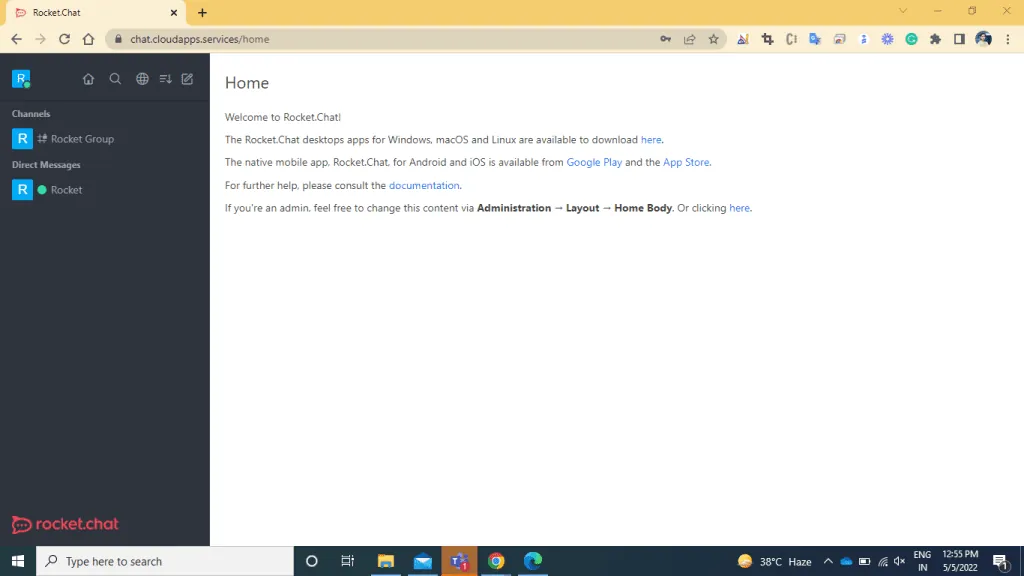
How to Set Up the Rocket.Chat Communication Platform
Below is the installation guide. We tested it in the following environment:
- Rocket.Chat 3.0.0
- OS: Ubuntu 18.04 LTS, Ubuntu 19.04 and Ubuntu 20.04(Latest)
- Mongodb 4.0.9
- NodeJS 12.14.0
Step 1: Install Necessary Dependency Packages
Update package list and configure apt to install the official MongoDB packages with the following repository file:
sudo apt-get -y update
Next, add the MongoDB signing key:
sudo apt-key adv --keyserver hkp://keyserver.ubuntu.com:80 --recv 9DA31620334BD75D9DCB49F368818C72E52529D4
Then add the MongoDB repository:
echo "deb [ arch=amd64 ] https://repo.mongodb.org/apt/ubuntu bionic/mongodb-org/4.0 multiverse" | sudo tee /etc/apt/sources.list.d/mongodb-org-4.0.list
Configure Node.js to be installed via package manager:
sudo apt-get -y update && sudo apt-get install -y curl && curl -sL https://deb.nodesource.com/setup_12.x | sudo bash -
Install build tools, MongoDB, nodejs and graphicsmagick:
sudo apt-get install -y build-essential mongodb-org nodejs graphicsmagick
Run the following command to install
npm sudo apt install nodejs
node -v or node –version
sudo apt install npm
npm -v or npm –version
sudo npm install -g inherits n && sudo n 12.14.0
Using npm install inherits and n, and the node version required by Rocket.Chat:
sudo npm install -g inherits n && sudo n 12.14.0
Step 2: Install Rocket.Chat
Download the latest Rocket.Chat version:
curl -L https://releases.rocket.chat/latest/download -o /tmp/rocket.chat.tgz
tar -xzf /tmp/rocket.chat.tgz -C /tmp
Install (this guide uses /opt but feel free to choose a different directory):
cd /tmp/bundle/programs/server && npm install
sudo mv /tmp/bundle /opt/Rocket.Chat
Step 3: Configure the Rocket.Chat Service
Add the rocketchat user, and set the right permissions on the Rocket.Chat folder and create the Rocket.Chat service file:
sudo useradd -M rocketchat && sudo usermod -L rocketchat
sudo chown -R rocketchat:rocketchat /opt/Rocket.Chat
cat << EOF |sudo tee -a /lib/systemd/system/rocketchat.service
[Unit]
Description=The Rocket.Chat server
After=network.target remote-fs.target nss-lookup.target nginx.target mongod.target
[Service]
ExecStart=/usr/local/bin/node /opt/Rocket.Chat/main.js
StandardOutput=syslog
StandardError=syslog
SyslogIdentifier=rocketchat
User=rocketchat
Environment=MONGO_URL=mongodb://localhost:27017/rocketchat?repl icaSet=rs01
Environment=MONGO_URL=mongodb://localhost:27017/rocketchat?repl icaSet=rs01
[Install]
WantedBy=multi-user.target
EOF
Open the Rocket.Chat service file just created (/lib/systemd/system/rocketchat.service) using sudo and your favourite text editor, and change the ROOT_URL environmental variable to reflect the URL you want to use for accessing the server (optionally change MONGO_URL, MONGO_OPLOG_URL and PORT):
MONGO_URL=mongodb://localhost:27017/rocketchat?replicaSet=rs01
MONGO_OPLOG_URL=mongodb://localhost:27017/local?replicaSet=rs01
MONGO_OPLOG_URL=mongodb://localhost:27017/local?replicaSet=rs01
PORT=3000

Setup storage engine and replication for MongoDB (mandatory for versions > 1), and enable and start MongoDB and Rocket.Chat:
sudo sed -i "s/^# engine:/ engine: mmapv1/" /etc/mongod.conf
sudo sed -i "s/^#replication:/replication:\n replSetName: rs01/"/etc/mongod.conf
sudo systemctl enable mongod && sudo systemctl start mongod
mongo --eval "printjson(rs.initiate())"
sudo systemctl enable rocketchat && sudo systemctl start rocketchat
Step 4: Set Up a Reverse Proxy with Nginx and SSL
To start, install Nginx.
sudo apt-get install -y nginx
Move your certificate’s private key file to the nginx folder /etc/nginx/certificate.key.
sudo cp /path/to/your/key /etc/nginx/certificate.key
For example,
if you created a now Let’s Encrypt certificate, you would use
sudo cp /etc/letsencrypt/live/your_domain_name/privkey.pem /etc/nginx/certificate.key.
Modify the permissions of keys so unauthorized robbers can’t gain access.
sudo chmod 400 /etc/nginx/certificate.key
Copy the certificate to/etc/nginx/certificate.crt.
sudo cp /path/to/your/cert /etc/nginx/certificate.crt
If you created a Let’s Encrypt certificate.
the command is like
sudo cp /etc/letsencrypt/live/your_domain_name/cert.pem /etc/nginx/certificate.crt
We are going to create an entirely new configuration for Rocket.Chat, so you can remove the default/existing to make it easier.
sudo rm /etc/nginx/sites-enabled/default
If you need that file back in the future, it is still available at/etc/nginx/sites-available/default.
now, Create a new/etc/nginx/sites-enabled/defaultwith nano or your favourite text editor
sudo nano /etc/nginx/sites-enabled/default
First, we’ll add an upstream block:
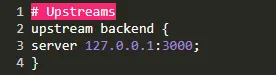
Now let’s create a server block. The first part tells Nginx which port to listen for connections on, in this case :443. It also allows it to know what our hostname is example.com.
Don’t forget to replace example.com with your domain name.
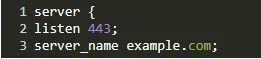
Under that part, we tell Nginx where they can find the Rocket.Chat’s access logs, and we point it to the SSL certificate and key we placed in/etc/nginx/certificate.key and /etc/nginx/certificate.crt, respectively.

And now, let's finish the configuration off with a location block:
Next, add the location block:
location / {
    proxy_pass http://example.com:3000/;
    proxy_http_version 1.1;
    proxy_set_header Upgrade $http_upgrade;
    proxy_set_header Connection "upgrade";
    proxy_set_header Host $http_host;
    proxy_set_header X-Real-IP $remote_addr;
    proxy_set_header X-Forward-For $proxy_add_x_forwarded_for;
    proxy_set_header X-Forward-Proto http;
    proxy_set_header X-Nginx-Proxy true;
    proxy_redirect off;
    }
}
- Here is the whole file for reference:
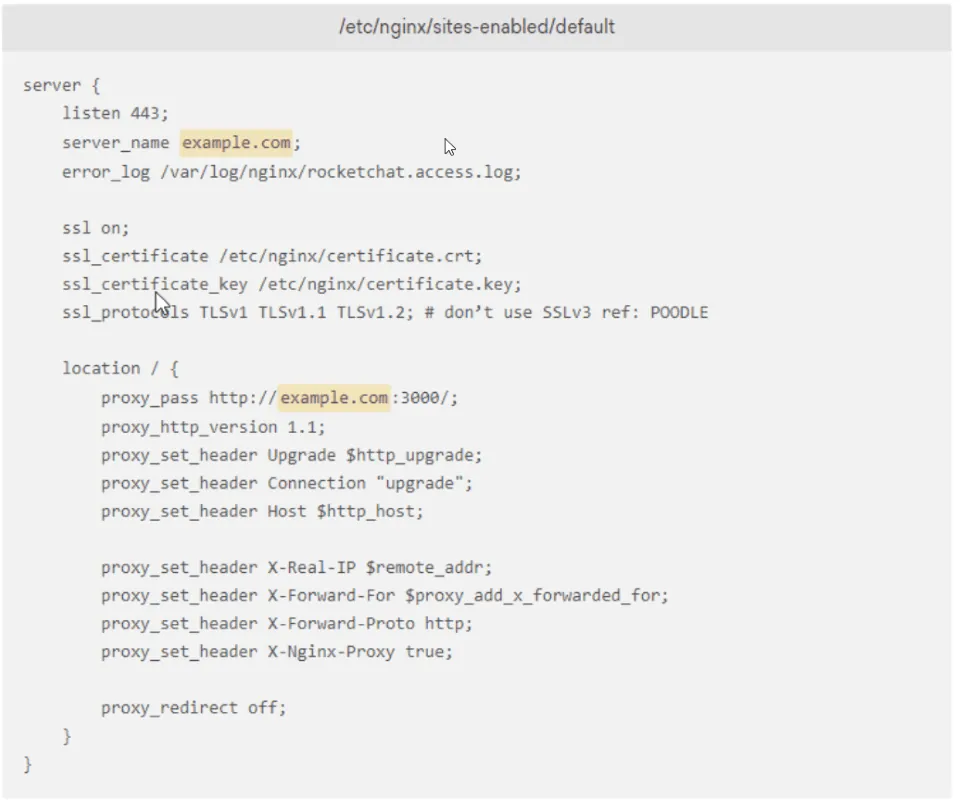
Save and exit the file. Then restart Nginx to finish the job.
sudo service nginx restart
Check if Nginx is running.
sudo service nginx status
If you see the following text, Nginx is up and running:

If you see an error message, then check the log file at
/var/log/nginx/rocketchat.access.log and /var/log/nginx/access.log or the error logs at /var/log/nginx/error.log You can also run nginx -t to verify your Nginx configuration file, which is where most errors show up.
Rocket.Chat Communication Platform Configuration
Configure Administration account
- Set the Auto to opt-in new users for Two Factor via Email to No.
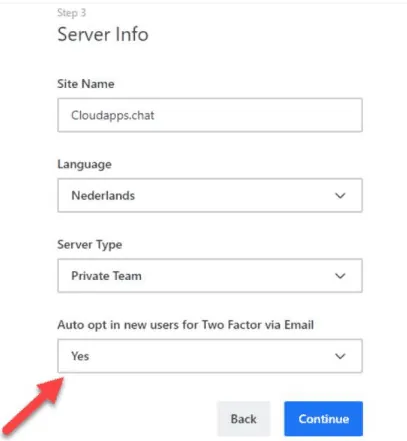
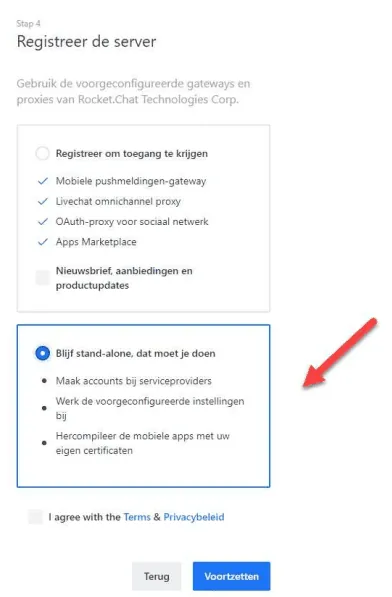
- And set the Registreer de server to Blijf stand-alone, dat moet je doen
How can I change Rocket.Chat logo and favicon icon for my own?
To change Rocket.Chat logo for your own (logo of your company), please, navigate to Administration -> Assets. There you will be able to modify the logo, login background, and icon:
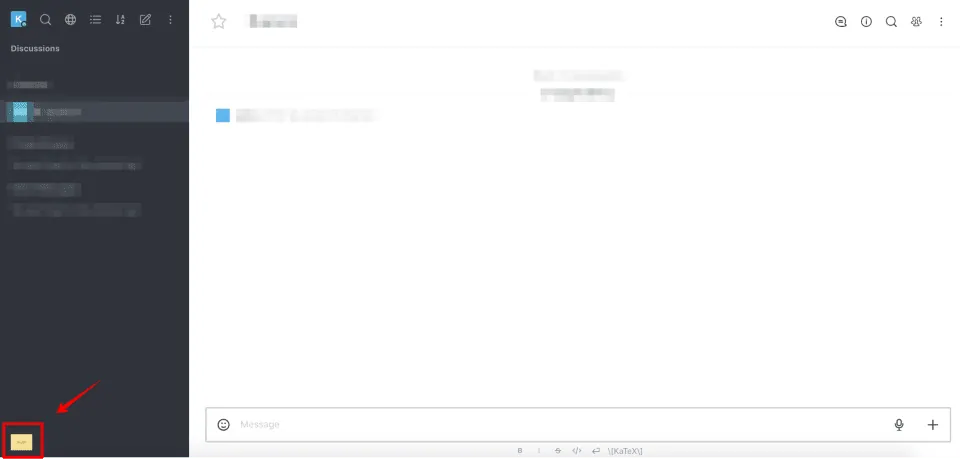
- To change the logo (the one that is located under the chats list at the bottom left side), click on “Select file” opposite the first field (logo (SVG, png, jpg)) and select the corresponding file from your library.
- After this, click on “Apply and refresh all clients” to finish the process.
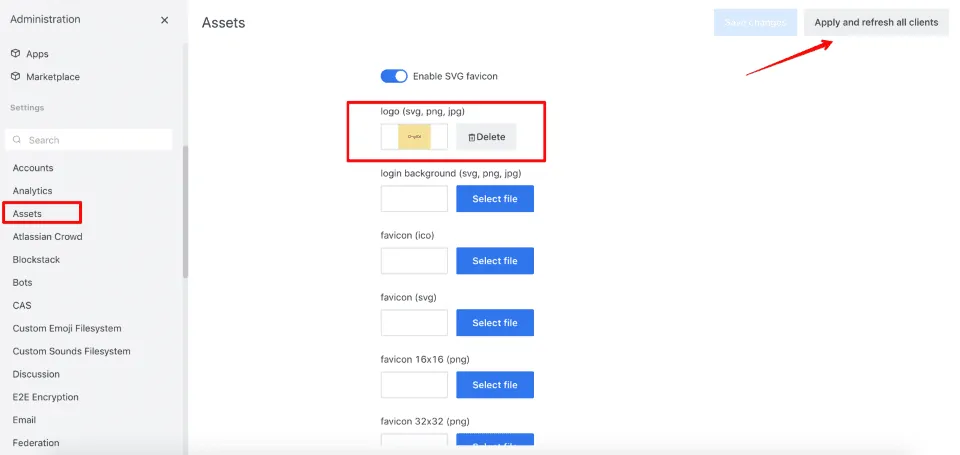
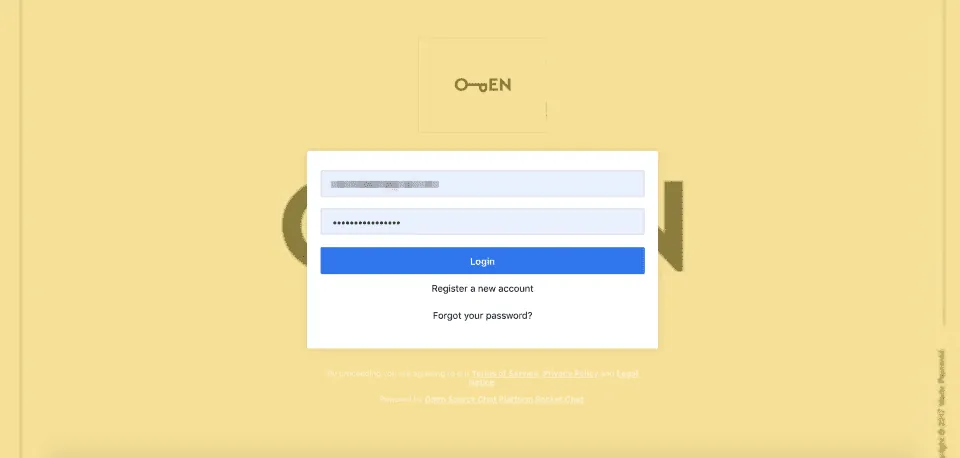
- To change the login background, click on “Select file” opposite the second field (login background (SVG, png, jpg)) and select the corresponding file from your library. After this, click on “Apply and refresh all clients” to finish the process.
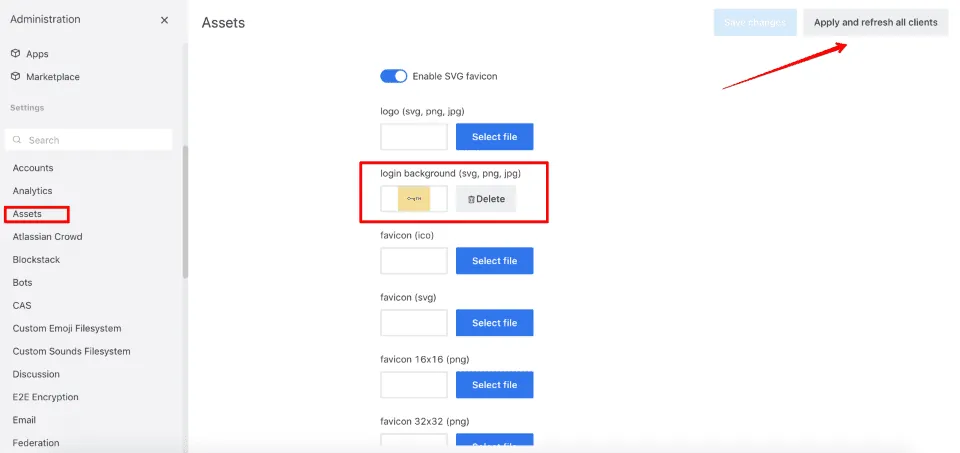
To change the icon, click on “Select file” opposite the appropriate filed out of the four given (depending on the file type) and select the corresponding file from your library. Further, click on “Apply and refresh all clients” to finish the process.
Disable Discussion
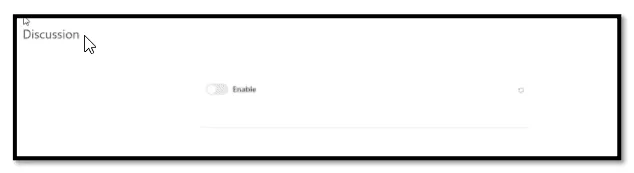
Go to Administration, Then search Discussion and click Discussion And disable it.
Configure some css for hiding channels and maintain the logo on the login page –
Go to Administration Then search Layout and click Layout and write custom CSS
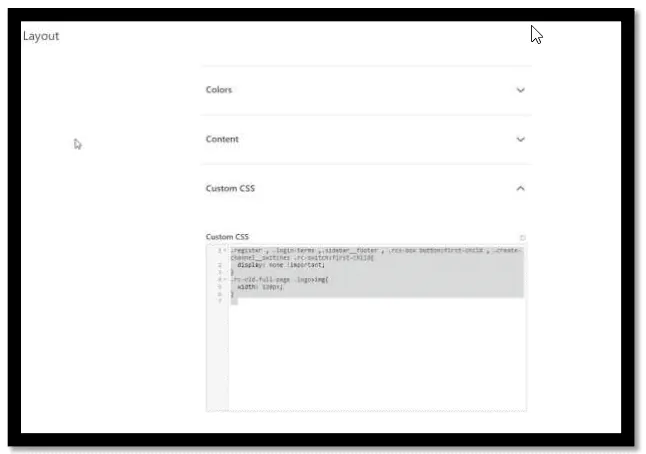
Add the following CSS:
register , .login-terms ,.sidebar__footer , .rcx-box button:first-child , .create-channel__switches .rc-switch:first-child{
    display: none !important;
}
.rc-old.full-page .logo>img{
    width: 120px;
}
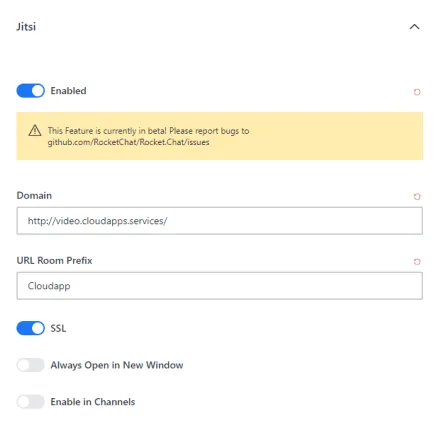
Configure jitsi
Go to Video Conference from the Administration
- Enable it
- Add Domain
- Add URL Room Prefix
Congratulations! You now have your own Rocket.Chat communication platform for you and your team, running on an Ubuntu server. It is set to launch at boot using the forever service. SSL is fully loaded through an Nginx reverse proxy. Next, you may want to add more colleagues, create more channels, or check out the Integrations section of the Administration menu. Learn more at the official Rocket.Chat site.
Have a question about this?
Book a 30-minute call with an engineer who works on it.