
This guide to Salesforce Apex starts with the meaning of Apex. Apex is an object-oriented programming language that lets Salesforce developers run flow and transaction control statements on the Salesforce Lightning platform server. It also makes calls to the Lightning Platform API.
Salesforce Apex syntax looks like Java and acts like database stored procedures. Further, it lets developers add business logic to most system events, button clicks, related record updates, and Visualforce pages. Web service requests and triggers on objects can start it.
Salesforce Apex Key Features
Integration in Salesforce Apex
Its code gives built-in support for the common Lightning Platform features, including:
- Data manipulation language (DML) calls, like INSERT, UPDATE, and DELETE, with built-in exception handling.
- Inline (SOQL) Salesforce Object query language and Salesforce Object search language (SOSL) query comes with lists of sObject records.
- The iteration that enables the bulk process of multiple records at a time
- Custom public API calls that you build from stored Apex methods
- Warnings and errors about Apex references appear when a user tries to edit or delete a custom object or field.
Easy to Use
First, it relies on familiar Java idioms, like variable and expression syntax, block and conditional statement syntax, loop syntax, object, and array notation. Wherever Apex introduces new parts, it uses syntax and linguistics that are simple to grasp and encourage economical use of the Lightning Platform. Therefore, it produces concise code that is also simple to write.
Data targeted
Salesforce Apex code groups multiple queries and DML statements into one unit of work on the Salesforce server. Developers likewise use database stored procedures to group multiple transaction statements on a database server.
Rigorous
Salesforce Apex is a strongly typed language that directly references schema objects like objects and field names. It stores all custom fields, objects, and class dependencies in metadata. This way, nobody can delete them while active Apex code needs them. At compile time, it fails quickly if any reference is invalid.
Hosted
The Lightning Platform interprets, executes, and controls Salesforce Apex entirely.
Multi Tenant aware
Like the whole of the Lightning Platform, Salesforce Apex runs in multi tenant surroundings. Any code that violates the limit fails with easy-to-understand error messages. So, the Apex runtime engine protects against runaway code and stops it from monopolizing shared resources.
Easy to check
Salesforce Apex provides built-in support for creating and running unit tests. Test results show how much code the tests cover and which parts of your code could be more efficient. Salesforce also runs unit tests on your custom Apex code before any platform upgrade, to make sure it still works.
Salesforce Apex Core Constructs to Understand
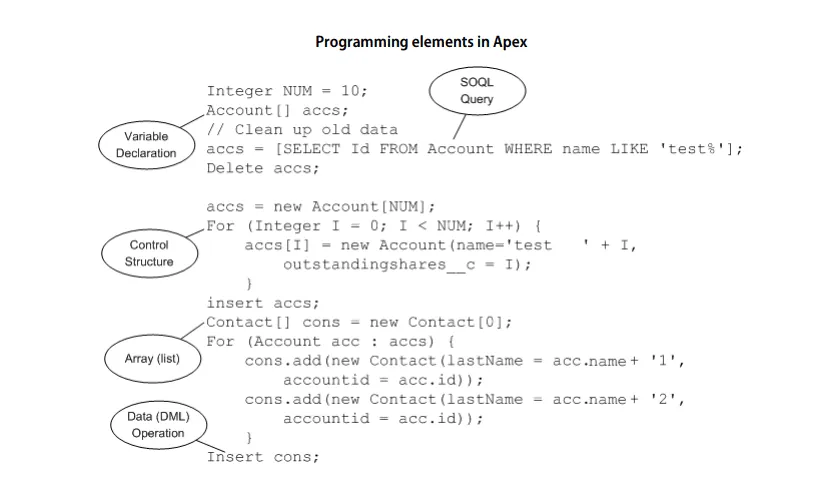
Writing Apex via Development Environments
You can develop Apex code in many development environments. This section covers the Developer Console, which lets you write, test, compile, and debug your Apex code.
Developer Console for Salesforce Apex
It is an integrated development environment with various tools that you can use to create, debug, and test applications in your Salesforce organization. It supports the tasks below.
Writing code
You can add code in the source code editor. You can also browse packages in your organization.
Compiling code
Once you save a trigger or class, the console compiles the code automatically. It also reports any compilation errors.
Debugging
You can read logs and set checkpoints that help with debugging.
Testing
You can run tests of specific test classes or all tests in your organization, and read the results. Also, you can examine code coverage.
Checking Performance
Further, examine the logs to find performance bottlenecks.
SQL queries
You can query data in your organization and look at the results in the query editor.
Color cryptography and autocomplete
The source code editor uses a color scheme so you can read the code and built-in methods quickly. It also autocompletes class and method names, and it shows errors when it finds them.
Create a Custom Object
From the management settings for custom objects, if you’re using Salesforce Classic, click New Custom Object, or choose to Create > Custom Object in case of lightning expertise.
- Enter Book for the label.
- Along with this, enter Books for the plural label.
- Click Save. Ta-dah! You’ve currently created your 1st custom object. Now, let’s produce a custom field.
- In this section of the Book detail page, click New.
- Select Number for the data type and then click to Next.
- Enter the value for the field label.
- After this, enter sixteen in the length text box.
- Enter two in the decimal places text box, and click Next.
- To accept the default value for field-level security click on next.
- Then select Save.
You’ve created a custom object known as Book and added a custom field to the custom object. These have already got some standard fields, like Name and CreatedBy, and permit you to feature alternative fields that area unit a lot of specific to your implementation. For this tutorial, the value field is an element of our Book object and is accessed by the Apex class you may write within the next step
Adding a Salesforce Apex Class
Here, we add an Apex class that contains a method for updating the book price. The trigger calls this method, which you add in the next step.
From the Setup, enter “Apex Classes” in the Quick Find box, then select the Apex Class and click to New.
In the class editor, enter the following class definition:

The previously mentioned code is the class definition to which we are going to add one method in the coming step. The Salesforce API is usually contained in the classes.
The class is public, which means other Apex classes and triggers can use it.
The above method definition between the class opening and closing brackets.

The applyDiscount method in Salesforce Apex
The method is called applyDiscount, and it is both public and static. You can use the name of the class followed by a dot (.) and then the name of the method you need.
Just because it’s a static method, there is no need to create an instance of the class to access the method.
One parameter by above method, a list of the Book records assigned to the variable, books. The suffix __c in the object name Book__c indicates that it is a custom object that you have created in Salesforce. Some standard objects provided in the Salesforce application, like
Account, don’t end with this postfix __c. Now, The next section of code contains the rest of the method definition:

Custom fields in the Apex class
Notice the __c after the name of the field Price__c. This indicates that it’s a custom field that you have created. Standard fields are provided by default in the Salesforce and are accessed using the same type of dot(.) notation but without the suffix __c. for example, the Name field doesn’t end with __c in Book__c.Name as this field is standard. The statement b.Price__c *= 0.9; takes the old/existing value of the b.Price__c, and multiplies it by 0.9, which means that its value will be discounted by 10%, and then stores the new value into the b.Price__c field. The *= operator is a shortcut. Now, Another way to write this statement is b.Price__c = b.Price__c * 0.9.
Click the option Save to save the newly created class. It would be best if you now had a whole class definition like this.

We have a class containing some code that iterates over a list of books and updates the Price field for each Book.
This code is a part of the apply Discount static method called through a trigger you will create in the next step.
Add a Salesforce Apex Trigger
For the custom object Book__c, you create a trigger that calls the applyDiscount method of the MyHelloWorld class that we made in the previous step.
It runs before or after records of a particular type of CRUD operation on the Lightning platform.
Each of these triggers runs with a specific set of context variables that access the records that cause the trigger to fire.
They process several records at once.
From the settings called object management for books, go to Triggers and then click New.
In the trigger editor, replace the default template code with this trigger definition:

The very first line of the code defines the trigger:

As a result it gets a name, specifies an object on which it operates, and defines the events that cause it to fire. For example, the trigger is called HelloWorldTrigger, operates on the object Book__c, and runs before the new books are inserted into the database.
Further in Next line of the trigger creates a list of book records named books and assigns it the contents of the trigger context variable, called Trigger.new. These are implicitly defined in all triggers and provide access to the records that cause the trigger to fire. It contains all the latest books about to be inserted in the current case.

The Following line of code calls the method applyDiscount in the class MyHelloWorld. It passes in the new books array.

Hence you have all the code to update the price of all books and insert them. Although, there is still one piece of the puzzle missing. Unit tests are an essential part of writing the code. You will see why this is so, and then you can add a test class to complete all the actions.
Add a Salesforce Apex Test Class
Meanwhile, we add a test class with a test method. It exercises and validates the code in the trigger and class.
Also, it enables you to reach 100% code coverage for the trigger and class. You can also run the test and verify code coverage.
Test coverage rules for Salesforce Apex
Note: Testing is an integral part of any development process. Before deploying the Apex or packaging it for the Salesforce AppExchange the following must be confirmed:
Unit tests must cover at least 75% of your Apex code, and all of those tests must complete successfully. Note the following.
– When deploying Apex to a production organization, each unit test in your organization’s namespace is executed by default.
– Calls to System.debug don’t form as part of Apex code coverage.
– Test methods and classes don’t come it.
– While tests must cover only 75% of your Apex code, don’t focus on the percentage of covered code. Instead, be sure that each use case of the application is covered, including the positive and the negative case and bulk and single records. This approach ensures that unit tests cover 75% of your code.
Every trigger must have some test coverage.
Successful compilation of All the classes and triggers is necessary.
- From the Setup, enter “Apex Classes” in the Quick Find box, select the “Apex Classes,” and click the New option.
- Add this test class definition in the class editor and click Save.
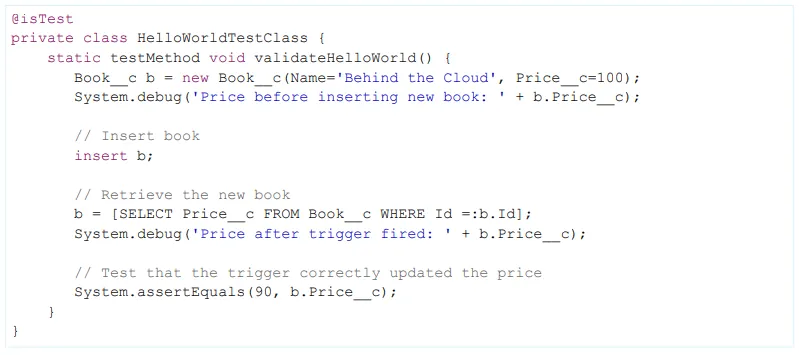
The test class definition
You define it with the @isTest annotation. Classes defined this way should only contain test methods and any methods required to support these test methods. One of the advantages of creating a separate class for testing is that classes defined with is Test don’t count against your org’s limit of 6 MB of Apex code.
You can also add the @isTest annotation to individual methods. The method validateHelloWorld is a testMethod. This annotation means that if the test changes the database, Salesforce rolls the changes back after the execution completes.
No need to delete any test data created in the test method.
First, a book is temporarily created and inserted into the database. The System debug statement writes the price value in the debug log.

Newly inserted Book will be retrieved by the the, by the assigned ID. The System debug statement then logs the new price that the trigger modified.

Run the test and check coverage
When the MyHelloWorld class runs, it updates the Price__c field and reduces its value by 10%.
The following test verifies that the method applyDiscount ran and produced the expected result.
- To run it and view the code coverage details, switch to the Developer Console.
- Here, follow Test > New Run.
- Click HelloWorldTestClass and select your TestClass.
- To add all of the methods in the HelloWorldTestClass to the test run, click the Add Selected.
- Go to Run
The test results display in the Tests tab/section. Further view details about the methods which ran by expanding any of the test classes in the Test tab. In the current case, the class contains only one test method.
- Overall Code Coverage tab shows the coverage of your test class. To view the % of lines of your code in the trigger covered by the test, which may be 100%, double-click on the code coverage line for the HelloWorldTrigger. A method is called from the MyHelloWorld class; this class also has full coverage (100%). To view it, double-click class.
- Go to the Logs tab and double-click the most recent logline in the logs list to open the log file. The execution of log displays, including the logging information about the trigger event, that call to the applyDiscount method, and the price before and after the trigger.
Finally, we have completed all the necessary steps for writing a bit of Apex code with a test class that runs in your development environment.
In the next step, We will discuss the deployment of the code and the custom object you’ve created. After testing your code and being satisfied with the result, you can deploy your code and any of the prerequisite components to the production org.
Deploying Components to Production
Finally, we have completed all the necessary steps for writing a bit of Apex code with a test class that runs in your development environment.
- From the Setup, enter Outbound Change sets in the Quick Find box, then select Outbound Changesets.
- Meanwhile, If a splash page appears, click Continue.
- In the Change Sets list, click New.
- Enter a name for your changeset, for example, HelloWorldChangeSet, and optionally a description. Click Save.
- Go to the Add-in Change Set Components section.
- Select the “Apex Class” from the choose component type drop-down list, then select the MyHelloWorld and the HelloWorldTestClass class from the list and click Add to Change Set.
- Click View/Add Dependencies option to add the dependent components.
- Go to the top of the checkbox to select all the existing components. Add To Change Set.
- Detail section of the change set page, click Upload.
- Select the target organization, like Production, and start Uploading.
Deploy the change set in production
- After the change set upload completes, deploy it in your production organization later.
- Further, Log into your production organization.
- From the Setup, enter Inbound Change Sets in the Quick Find box, then select Inbound Change Sets.
- If a splash page appears, click Continue.
- Select your change set’s name in the change sets awaiting deployment list, .
- Conclude by Selecting Deploy.
Conclusion
To sum up, this guide covered Salesforce Apex programming. We created a custom object and added an Apex trigger, class, and test class.
Finally, we learned how to test the code and upload it, with the custom object, to the production tenant using change sets. To explore more, see our custom software work.
Have a question about this?
Book a 30-minute call with an engineer who works on it.